41-41-IPC(中):不同项目组之间抢资源,如何协调?
了解了如何使用共享内存和信号量集合之后,今天我们来解析一下,内核里面都做了什么。
不知道你有没有注意到,咱们讲消息队列、共享内存、信号量的机制的时候,我们其实能够从中看到一些统一的规律:它们在使用之前都要生成key,然后通过key得到唯一的id,并且都是通过xxxget函数。
在内核里面,这三种进程间通信机制是使用统一的机制管理起来的,都叫ipcxxx。
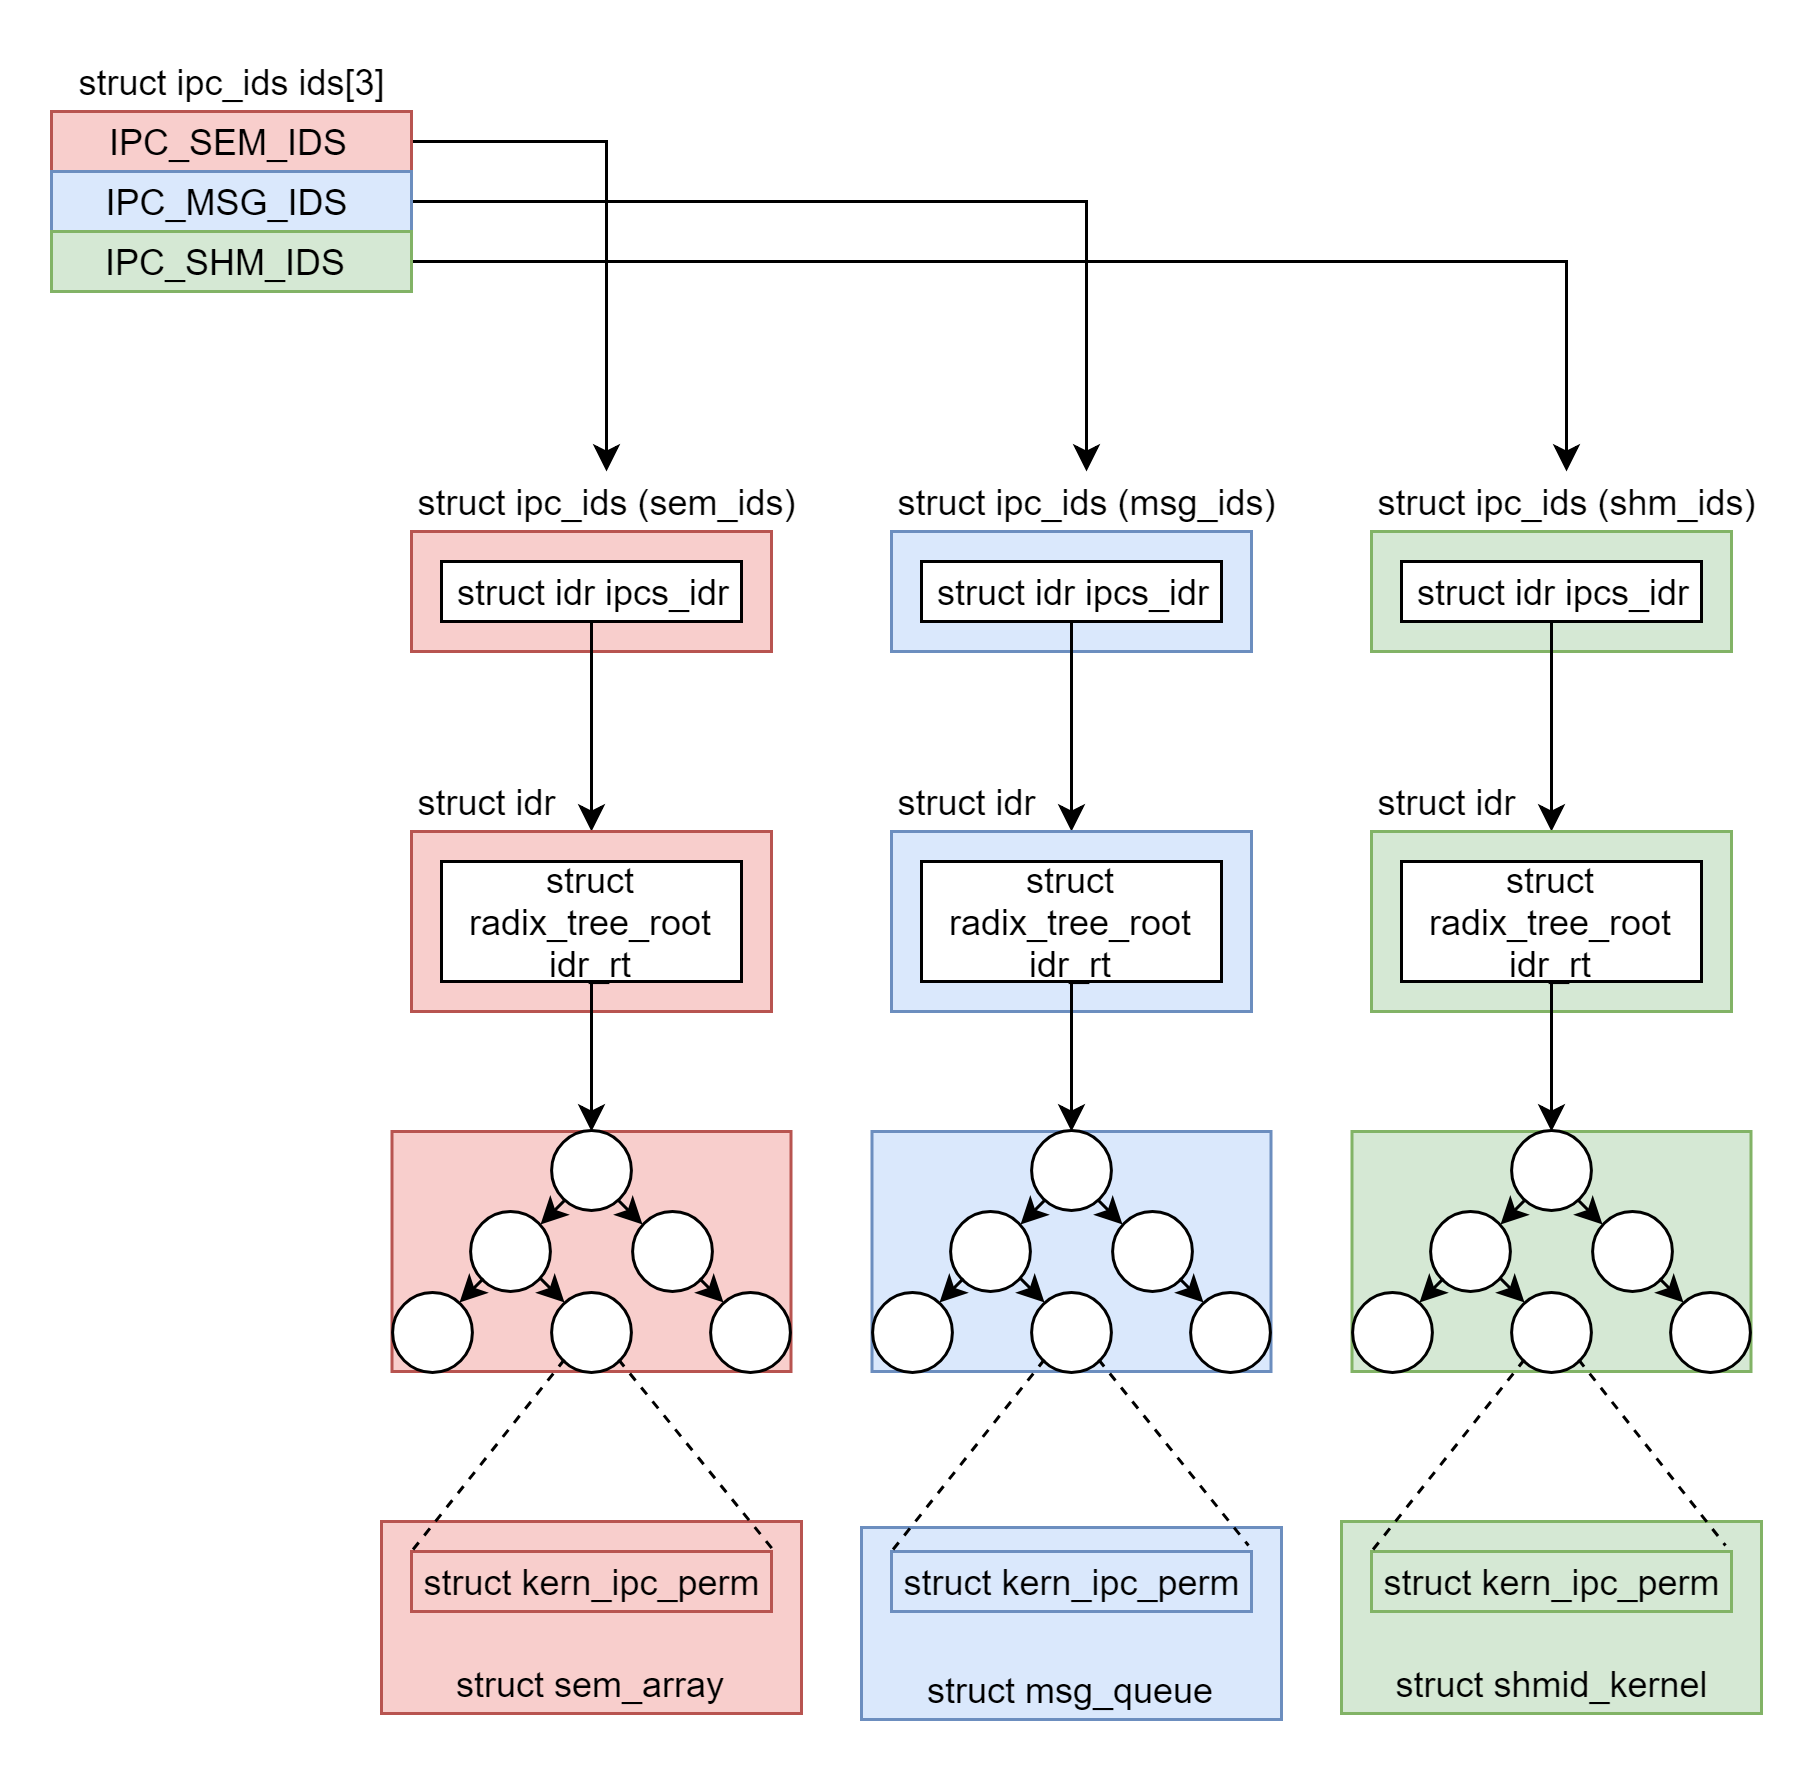
为了维护这三种进程间通信进制,在内核里面,我们声明了一个有三项的数组。
我们通过这段代码,来具体看一看。
struct ipc_namespace {
......
    struct ipc_ids  ids[3];
......
}

#define IPC_SEM_IDS 0
#define IPC_MSG_IDS 1
#define IPC_SHM_IDS 2

#define sem_ids(ns) ((ns)->ids[IPC_SEM_IDS])
#define msg_ids(ns) ((ns)->ids[IPC_MSG_IDS])
#define shm_ids(ns) ((ns)->ids[IPC_SHM_IDS])
根据代码中的定义,第0项用于信号量,第1项用于消息队列,第2项用于共享内存,分别可以通过sem_ids、msg_ids、shm_ids来访问。
这段代码里面有ns,全称叫namespace。可能不容易理解,你现在可以将它认为是将一台Linux服务器逻辑的隔离为多台Linux服务器的机制,它背后的原理是一个相当大的话题,我们需要在容器那一章详细讲述。现在,你就可以简单的认为没有namespace,整个Linux在一个namespace下面,那这些ids也是整个Linux只有一份。
接下来,我们再来看struct ipc_ids里面保存了什么。
首先,in_use表示当前有多少个ipc;其次,seq和next_id用于一起生成ipc唯一的id,因为信号量,共享内存,消息队列,它们三个的id也不能重复;ipcs_idr是一棵基数树,我们又碰到它了,一旦涉及从一个整数查找一个对象,它都是最好的选择。
struct ipc_ids {
    int in_use;
    unsigned short seq;
    struct rw_semaphore rwsem;
    struct idr ipcs_idr;
    int next_id;
};

struct idr {
    struct radix_tree_root  idr_rt;
    unsigned int        idr_next;
};
也就是说,对于sem_ids、msg_ids、shm_ids各有一棵基数树。那这棵树里面究竟存放了什么,能够统一管理这三类ipc对象呢?
通过下面这个函数ipc_obtain_object_idr,我们可以看出端倪。这个函数根据id,在基数树里面找出来的是struct kern_ipc_perm。
struct kern_ipc_perm *ipc_obtain_object_idr(struct ipc_ids *ids, int id)
{
    struct kern_ipc_perm *out;
    int lid = ipcid_to_idx(id);
    out = idr_find(&ids->ipcs_idr, lid);
    return out;
}
如果我们看用于表示信号量、消息队列、共享内存的结构,就会发现,这三个结构的第一项都是struct kern_ipc_perm。
struct sem_array {
    struct kern_ipc_perm    sem_perm;   /* permissions .. see ipc.h */
    time_t          sem_ctime;  /* create/last semctl() time */
    struct list_head    pending_alter;  /* pending operations */
                                        /* that alter the array */
    struct list_head    pending_const;  /* pending complex operations */
                        /* that do not alter semvals */
    struct list_head    list_id;    /* undo requests on this array */
    int         sem_nsems;  /* no. of semaphores in array */
    int         complex_count;  /* pending complex operations */
    unsigned int        use_global_lock;/* >0: global lock required */

    struct sem      sems[];
} __randomize_layout;

struct msg_queue {
    struct kern_ipc_perm q_perm;
    time_t q_stime;         /* last msgsnd time */
    time_t q_rtime;         /* last msgrcv time */
    time_t q_ctime;         /* last change time */
    unsigned long q_cbytes;     /* current number of bytes on queue */
    unsigned long q_qnum;       /* number of messages in queue */
    unsigned long q_qbytes;     /* max number of bytes on queue */
    pid_t q_lspid;          /* pid of last msgsnd */
    pid_t q_lrpid;          /* last receive pid */

    struct list_head q_messages;
    struct list_head q_receivers;
    struct list_head q_senders;
} __randomize_layout;

struct shmid_kernel /* private to the kernel */
{
    struct kern_ipc_perm    shm_perm;
    struct file     *shm_file;
    unsigned long       shm_nattch;
    unsigned long       shm_segsz;
    time_t          shm_atim;
    time_t          shm_dtim;
    time_t          shm_ctim;
    pid_t           shm_cprid;
    pid_t           shm_lprid;
    struct user_struct  *mlock_user;

    /* The task created the shm object.  NULL if the task is dead. */
    struct task_struct  *shm_creator;
    struct list_head    shm_clist;  /* list by creator */
} __randomize_layout;
也就是说,我们完全可以通过struct kern_ipc_perm的指针,通过进行强制类型转换后,得到整个结构。做这件事情的函数如下:
static inline struct sem_array *sem_obtain_object(struct ipc_namespace *ns, int id)
{
    struct kern_ipc_perm *ipcp = ipc_obtain_object_idr(&sem_ids(ns), id);
    return container_of(ipcp, struct sem_array, sem_perm);
}

static inline struct msg_queue *msq_obtain_object(struct ipc_namespace *ns, int id)
{
    struct kern_ipc_perm *ipcp = ipc_obtain_object_idr(&msg_ids(ns), id);
    return container_of(ipcp, struct msg_queue, q_perm);
}

static inline struct shmid_kernel *shm_obtain_object(struct ipc_namespace *ns, int id)
{
    struct kern_ipc_perm *ipcp = ipc_obtain_object_idr(&shm_ids(ns), id);
    return container_of(ipcp, struct shmid_kernel, shm_perm);
}
通过这种机制,我们就可以将信号量、消息队列、共享内存抽象为ipc类型进行统一处理。你有没有觉得,这有点儿面向对象编程中抽象类和实现类的意思?没错,如果你试图去了解C++中类的实现机制,其实也是这么干的。
有了抽象类,接下来我们来看共享内存和信号量的具体实现。
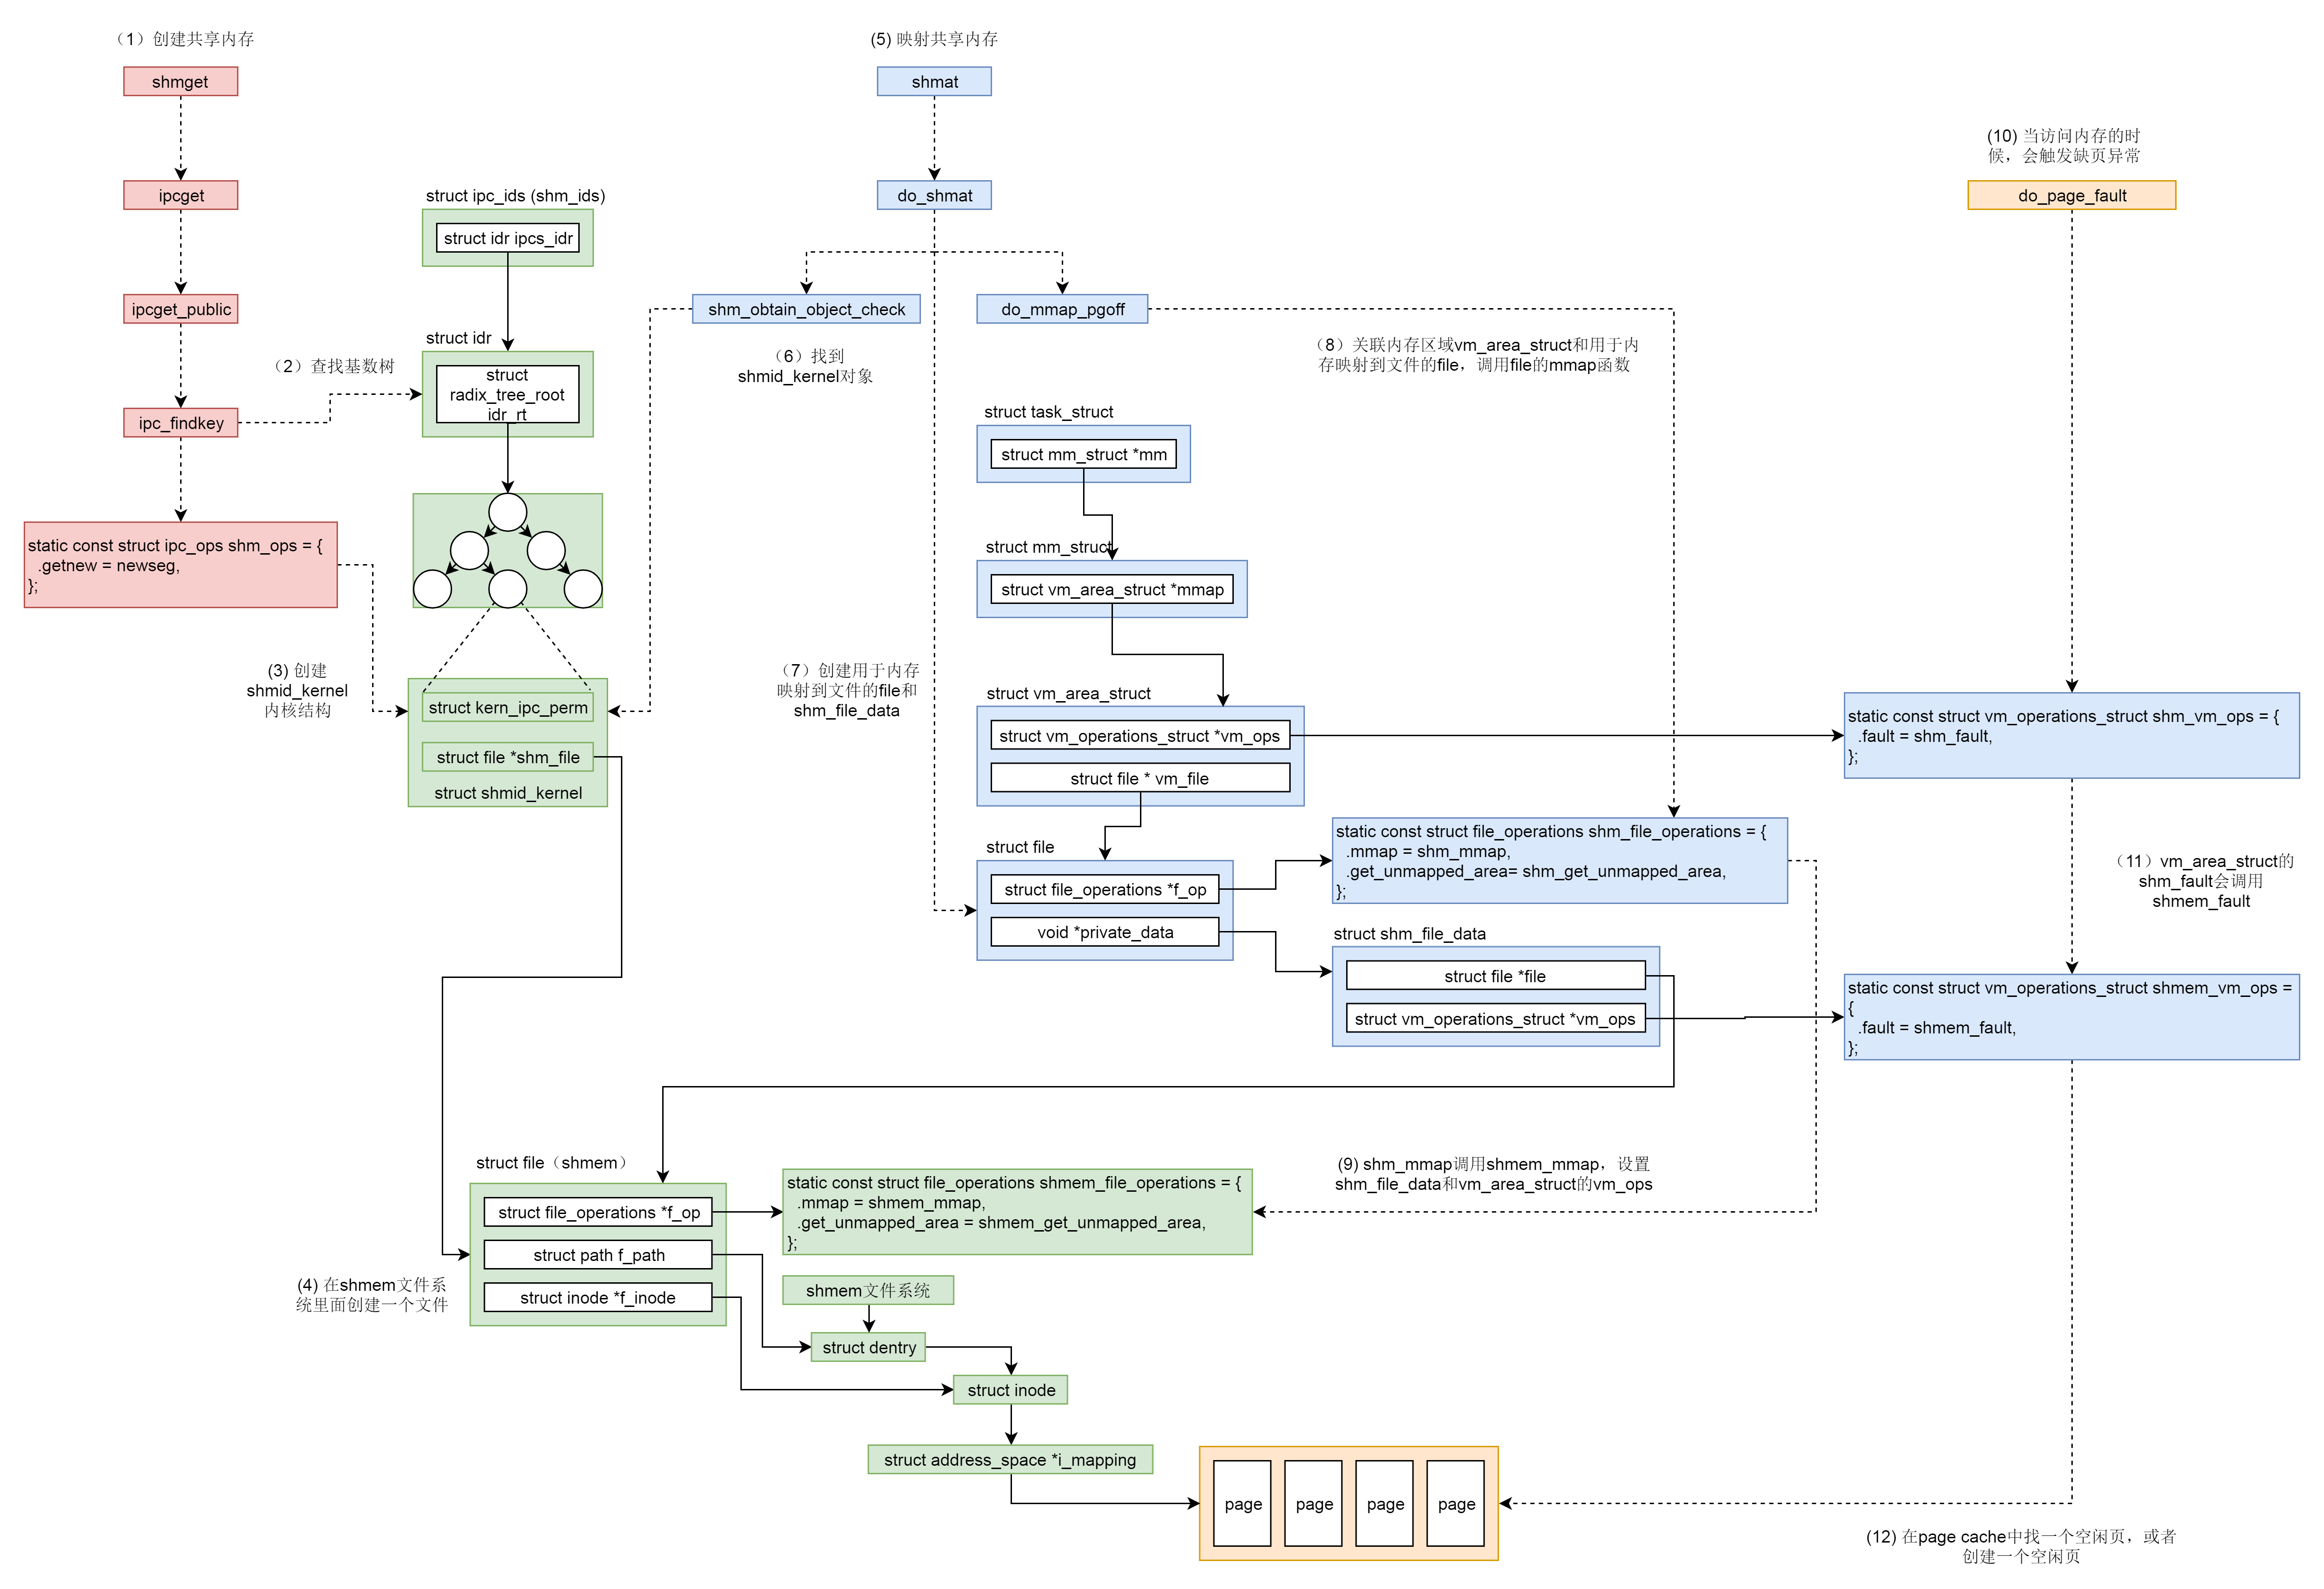
如何创建共享内存?
首先,我们来看创建共享内存的的系统调用。
SYSCALL_DEFINE3(shmget, key_t, key, size_t, size, int, shmflg)
{
    struct ipc_namespace *ns;
    static const struct ipc_ops shm_ops = {
        .getnew = newseg,
        .associate = shm_security,
        .more_checks = shm_more_checks,
    };
    struct ipc_params shm_params;
    ns = current->nsproxy->ipc_ns;
    shm_params.key = key;
    shm_params.flg = shmflg;
    shm_params.u.size = size;
    return ipcget(ns, &shm_ids(ns), &shm_ops, &shm_params);
}
这里面调用了抽象的ipcget、参数分别为共享内存对应的shm_ids、对应的操作shm_ops以及对应的参数shm_params。
如果key设置为IPC_PRIVATE则永远创建新的,如果不是的话,就会调用ipcget_public。ipcget的具体代码如下:
int ipcget(struct ipc_namespace *ns, struct ipc_ids *ids,
            const struct ipc_ops *ops, struct ipc_params *params)
{
    if (params->key == IPC_PRIVATE)
        return ipcget_new(ns, ids, ops, params);
    else
        return ipcget_public(ns, ids, ops, params);
}

static int ipcget_public(struct ipc_namespace *ns, struct ipc_ids *ids, const struct ipc_ops *ops, struct ipc_params *params)
{
    struct kern_ipc_perm *ipcp;
    int flg = params->flg;
    int err;
    ipcp = ipc_findkey(ids, params->key);
    if (ipcp == NULL) {
        if (!(flg & IPC_CREAT))
            err = -ENOENT;
        else
            err = ops->getnew(ns, params);
    } else {
        if (flg & IPC_CREAT && flg & IPC_EXCL)
            err = -EEXIST;
        else {
            err = 0;
            if (ops->more_checks)
                err = ops->more_checks(ipcp, params);
......
        }
    }
    return err;
}
在ipcget_public中,我们会按照key,去查找struct kern_ipc_perm。如果没有找到,那就看是否设置了IPC_CREAT;如果设置了,就创建一个新的。如果找到了,就将对应的id返回。
我们这里重点看,如何按照参数shm_ops,创建新的共享内存,会调用newseg。
static int newseg(struct ipc_namespace *ns, struct ipc_params *params)
{
key_t key = params->key;
int shmflg = params->flg;
size_t size = params->u.size;
int error;
struct shmid_kernel *shp;
size_t numpages = (size + PAGE_SIZE - 1) >> PAGE_SHIFT;
struct file *file;
char name[13];
vm_flags_t acctflag = 0;
......
shp = kvmalloc(sizeof(*shp), GFP_KERNEL);
......
shp->shm_perm.key = key;
shp->shm_perm.mode = (shmflg & S_IRWXUGO);
shp->mlock_user = NULL;
shp->shm_perm.security = NULL;
......
file = shmem_kernel_file_setup(name, size, acctflag);
......
shp->shm_cprid = task_tgid_vnr(current);
shp->shm_lprid = 0;
shp->shm_atim = shp->shm_dtim = 0;
shp->shm_ctim = get_seconds();
shp->shm_segsz = size;
shp->shm_nattch = 0;
shp->shm_file = file;
shp->shm_creator = current;
error = ipc_addid(&shm_ids(ns), &shp->shm_perm, ns->shm_ctlmni);
......
list_add(&shp->shm_clist, ¤t->sysvshm.shm_clist);
......
file_inode(file)->i_ino = shp->shm_perm.id;
ns->shm_tot += numpages;
error = shp->shm_perm.id;
......
return error;
}
newseg函数的第一步,通过kvmalloc在直接映射区分配一个struct shmid_kernel结构。这个结构就是用来描述共享内存的。这个结构最开始就是上面说的struct kern_ipc_perm结构。接下来就是填充这个struct shmid_kernel结构,例如key、权限等。
newseg函数的第二步,共享内存需要和文件进行关联。**为什么要做这个呢?我们在讲内存映射的时候讲过,虚拟地址空间可以和物理内存关联,但是物理内存是某个进程独享的。虚拟地址空间也可以映射到一个文件,文件是可以跨进程共享的。
咱们这里的共享内存需要跨进程共享,也应该借鉴文件映射的思路。只不过不应该映射一个硬盘上的文件,而是映射到一个内存文件系统上的文件。mm/shmem.c里面就定义了这样一个基于内存的文件系统。这里你一定要注意区分shmem和shm的区别,前者是一个文件系统,后者是进程通信机制。
在系统初始化的时候,shmem_init注册了shmem文件系统shmem_fs_type,并且挂在到了shm_mnt下面。
int __init shmem_init(void)
{
    int error;
    error = shmem_init_inodecache();
    error = register_filesystem(&shmem_fs_type);
    shm_mnt = kern_mount(&shmem_fs_type);
......
    return 0;
}

static struct file_system_type shmem_fs_type = {
    .owner      = THIS_MODULE,
    .name       = "tmpfs",
    .mount      = shmem_mount,
    .kill_sb    = kill_litter_super,
    .fs_flags   = FS_USERNS_MOUNT,
};
接下来,newseg函数会调用shmem_kernel_file_setup,其实就是在shmem文件系统里面创建一个文件。
/**
 * shmem_kernel_file_setup - get an unlinked file living in tmpfs which must be kernel internal.
 * @name: name for dentry (to be seen in /proc/<pid>/maps
 * @size: size to be set for the file
 * @flags: VM_NORESERVE suppresses pre-accounting of the entire object size */
struct file *shmem_kernel_file_setup(const char *name, loff_t size, unsigned long flags)
{
    return __shmem_file_setup(name, size, flags, S_PRIVATE);
}

static struct file *__shmem_file_setup(const char *name, loff_t size,
                       unsigned long flags, unsigned int i_flags)
{
    struct file *res;
    struct inode *inode;
    struct path path;
    struct super_block *sb;
    struct qstr this;
......
    this.name = name;
    this.len = strlen(name);
    this.hash = 0; /* will go */
    sb = shm_mnt->mnt_sb;
    path.mnt = mntget(shm_mnt);
    path.dentry = d_alloc_pseudo(sb, &this);
    d_set_d_op(path.dentry, &anon_ops);
......
    inode = shmem_get_inode(sb, NULL, S_IFREG | S_IRWXUGO, 0, flags);
    inode->i_flags |= i_flags;
    d_instantiate(path.dentry, inode);
    inode->i_size = size;
......
    res = alloc_file(&path, FMODE_WRITE | FMODE_READ,
          &shmem_file_operations);
    return res;
}
__shmem_file_setup会创建新的shmem文件对应的dentry和inode,并将它们两个关联起来,然后分配一个struct file结构,来表示新的shmem文件,并且指向独特的shmem_file_operations。
static const struct file_operations shmem_file_operations = {
    .mmap       = shmem_mmap,
    .get_unmapped_area = shmem_get_unmapped_area,
#ifdef CONFIG_TMPFS
    .llseek     = shmem_file_llseek,
    .read_iter  = shmem_file_read_iter,
    .write_iter = generic_file_write_iter,
    .fsync      = noop_fsync,
    .splice_read    = generic_file_splice_read,
    .splice_write   = iter_file_splice_write,
    .fallocate  = shmem_fallocate,
#endif
};
newseg函数的第三步,通过ipc_addid将新创建的struct shmid_kernel结构挂到shm_ids里面的基数树上,并返回相应的id,并且将struct shmid_kernel挂到当前进程的sysvshm队列中。
至此,共享内存的创建就完成了。
如何将共享内存映射到虚拟地址空间?
从上面的代码解析中,我们知道,共享内存的数据结构struct shmid_kernel,是通过它的成员struct file *shm_file,来管理内存文件系统shmem上的内存文件的。无论这个共享内存是否被映射,shm_file都是存在的。
接下来,我们要将共享内存映射到虚拟地址空间中。调用的是shmat,对应的系统调用如下:
SYSCALL_DEFINE3(shmat, int, shmid, char __user *, shmaddr, int, shmflg)
{
    unsigned long ret;
    long err;
    err = do_shmat(shmid, shmaddr, shmflg, &ret, SHMLBA);
    force_successful_syscall_return();
    return (long)ret;
}

long do_shmat(int shmid, char __user *shmaddr, int shmflg,
          ulong *raddr, unsigned long shmlba)
{
    struct shmid_kernel *shp;
    unsigned long addr = (unsigned long)shmaddr;
    unsigned long size;
    struct file *file;
    int    err;
    unsigned long flags = MAP_SHARED;
    unsigned long prot;
    int acc_mode;
    struct ipc_namespace *ns;
    struct shm_file_data *sfd;
    struct path path;
    fmode_t f_mode;
    unsigned long populate = 0;
......
    prot = PROT_READ | PROT_WRITE;
    acc_mode = S_IRUGO | S_IWUGO;
    f_mode = FMODE_READ | FMODE_WRITE;
......
    ns = current->nsproxy->ipc_ns;
    shp = shm_obtain_object_check(ns, shmid);
......
    path = shp->shm_file->f_path;
    path_get(&path);
    shp->shm_nattch++;
    size = i_size_read(d_inode(path.dentry));
......
    sfd = kzalloc(sizeof(*sfd), GFP_KERNEL);
......
    file = alloc_file(&path, f_mode,
              is_file_hugepages(shp->shm_file) ?
                &shm_file_operations_huge :
                &shm_file_operations);
......
    file->private_data = sfd;
    file->f_mapping = shp->shm_file->f_mapping;
    sfd->id = shp->shm_perm.id;
    sfd->ns = get_ipc_ns(ns);
    sfd->file = shp->shm_file;
    sfd->vm_ops = NULL;
......
    addr = do_mmap_pgoff(file, addr, size, prot, flags, 0, &populate, NULL);
    *raddr = addr;
    err = 0;
......
    return err;
}
在这个函数里面,shm_obtain_object_check会通过共享内存的id,在基数树中找到对应的struct shmid_kernel结构,通过它找到shmem上的内存文件。
接下来,我们要分配一个struct shm_file_data,来表示这个内存文件。将shmem中指向内存文件的shm_file赋值给struct shm_file_data中的file成员。
然后,我们创建了一个struct file,指向的也是shmem中的内存文件。
为什么要再创建一个呢?这两个的功能不同,shmem中shm_file用于管理内存文件,是一个中立的,独立于任何一个进程的角色。而新创建的struct file是专门用于做内存映射的,就像咱们在讲内存映射那一节讲过的,一个硬盘上的文件要映射到虚拟地址空间中的时候,需要在vm_area_struct里面有一个struct file *vm_file指向硬盘上的文件,现在变成内存文件了,但是这个结构还是不能少。
新创建的struct file的private_data,指向struct shm_file_data,这样内存映射那部分的数据结构,就能够通过它来访问内存文件了。
新创建的struct file的file_operations也发生了变化,变成了shm_file_operations。
static const struct file_operations shm_file_operations = {
    .mmap       = shm_mmap,
    .fsync      = shm_fsync,
    .release    = shm_release,
    .get_unmapped_area  = shm_get_unmapped_area,
    .llseek     = noop_llseek,
    .fallocate  = shm_fallocate,
};
接下来,do_mmap_pgoff函数我们遇到过,原来映射硬盘上的文件的时候,也是调用它。这里我们不再详细解析了。它会分配一个vm_area_struct指向虚拟地址空间中没有分配的区域,它的vm_file指向这个内存文件,然后它会调用shm_file_operations的mmap函数,也即shm_mmap进行映射。
static int shm_mmap(struct file *file, struct vm_area_struct *vma)
{
    struct shm_file_data *sfd = shm_file_data(file);
    int ret;
    ret = __shm_open(vma);
    ret = call_mmap(sfd->file, vma);
    sfd->vm_ops = vma->vm_ops;
    vma->vm_ops = &shm_vm_ops;
    return 0;
}
shm_mmap中调用了shm_file_data中的file的mmap函数,这次调用的是shmem_file_operations的mmap,也即shmem_mmap。
static int shmem_mmap(struct file *file, struct vm_area_struct *vma)
{
    file_accessed(file);
    vma->vm_ops = &shmem_vm_ops;
    return 0;
}
这里面,vm_area_struct的vm_ops指向shmem_vm_ops。等从call_mmap中返回之后,shm_file_data的vm_ops指向了shmem_vm_ops,而vm_area_struct的vm_ops改为指向shm_vm_ops。
我们来看一下,shm_vm_ops和shmem_vm_ops的定义。
static const struct vm_operations_struct shm_vm_ops = {
    .open   = shm_open, /* callback for a new vm-area open */
    .close  = shm_close,    /* callback for when the vm-area is released */
    .fault  = shm_fault,
};

static const struct vm_operations_struct shmem_vm_ops = {
    .fault      = shmem_fault,
    .map_pages  = filemap_map_pages,
};
它们里面最关键的就是fault函数,也即访问虚拟内存的时候,访问不到应该怎么办。
当访问不到的时候,先调用vm_area_struct的vm_ops,也即shm_vm_ops的fault函数shm_fault。然后它会转而调用shm_file_data的vm_ops,也即shmem_vm_ops的fault函数shmem_fault。
static int shm_fault(struct vm_fault *vmf)
{
    struct file *file = vmf->vma->vm_file;
    struct shm_file_data *sfd = shm_file_data(file);
    return sfd->vm_ops->fault(vmf);
}
虽然基于内存的文件系统,已经为这个内存文件分配了inode,但是内存也却是一点儿都没分配,只有在发生缺页异常的时候才进行分配。
static int shmem_fault(struct vm_fault *vmf)
{
    struct vm_area_struct *vma = vmf->vma;
    struct inode *inode = file_inode(vma->vm_file);
    gfp_t gfp = mapping_gfp_mask(inode->i_mapping);
......
    error = shmem_getpage_gfp(inode, vmf->pgoff, &vmf->page, sgp,
                  gfp, vma, vmf, &ret);
......
}

/*
 * shmem_getpage_gfp - find page in cache, or get from swap, or allocate
 *
 * If we allocate a new one we do not mark it dirty. That's up to the
 * vm. If we swap it in we mark it dirty since we also free the swap
 * entry since a page cannot live in both the swap and page cache.
 *
 * fault_mm and fault_type are only supplied by shmem_fault:
 * otherwise they are NULL.
 */
static int shmem_getpage_gfp(struct inode *inode, pgoff_t index,
    struct page **pagep, enum sgp_type sgp, gfp_t gfp,
    struct vm_area_struct *vma, struct vm_fault *vmf, int *fault_type)
{
......
    page = shmem_alloc_and_acct_page(gfp, info, sbinfo,
                    index, false);
......
}
shmem_fault会调用shmem_getpage_gfp在page cache和swap中找一个空闲页,如果找不到就通过shmem_alloc_and_acct_page分配一个新的页,他最终会调用内存管理系统的alloc_page_vma在物理内存中分配一个页。
至此,共享内存才真的映射到了虚拟地址空间中,进程可以像访问本地内存一样访问共享内存。
总结时刻
我们来总结一下共享内存的创建和映射过程。
- 调用shmget创建共享内存。
- 先通过ipc_findkey在基数树中查找key对应的共享内存对象shmid_kernel是否已经被创建过,如果已经被创建,就会被查询出来,例如producer创建过,在consumer中就会查询出来。
- 如果共享内存没有被创建过,则调用shm_ops的newseg方法,创建一个共享内存对象shmid_kernel。例如,在producer中就会新建。
- 在shmem文件系统里面创建一个文件,共享内存对象shmid_kernel指向这个文件,这个文件用struct file表示,我们姑且称它为file1。
- 调用shmat,将共享内存映射到虚拟地址空间。
- shm_obtain_object_check先从基数树里面找到shmid_kernel对象。
- 创建用于内存映射到文件的file和shm_file_data,这里的struct file我们姑且称为file2。
- 关联内存区域vm_area_struct和用于内存映射到文件的file,也即file2,调用file2的mmap函数。
- file2的mmap函数shm_mmap,会调用file1的mmap函数shmem_mmap,设置shm_file_data和vm_area_struct的vm_ops。
- 内存映射完毕之后,其实并没有真的分配物理内存,当访问内存的时候,会触发缺页异常do_page_fault。
- vm_area_struct的vm_ops的shm_fault会调用shm_file_data的vm_ops的shmem_fault。
- 在page cache中找一个空闲页,或者创建一个空闲页。
课堂练习
在这里,我们只分析了shm_ids的结构,消息队列的程序我们写过了,但是msg_ids的结构没有解析,你可以试着解析一下。
欢迎留言和我分享你的疑惑和见解 ,也欢迎可以收藏本节内容,反复研读。你也可以把今天的内容分享给你的朋友,和他一起学习和进步。